Kia Picanto (JA): Tires and wheels / Tire rotation
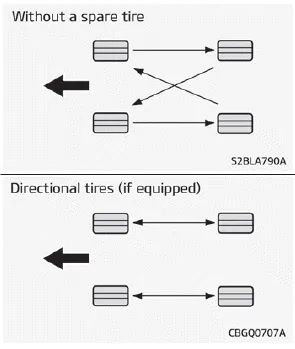
To equalize tread wear, it is recommended that the tires be rotated every 10,000 km (6,500 miles) or sooner if irregular wear develops.
During rotation, check the tires for correct balance.
When rotating tires, check for uneven wear and damage. Abnormal wear is usually caused by incorrect tire pressure, improper wheel alignment, outof- balance wheels, severe braking or severe cornering. Look for bumps or bulges in the tread or side of tire. Replace the tire if you find either of these conditions. Replace the tire if fabric or cord is visible. After rotation, be sure to bring the front and rear tire pressures to specification and check lug nut tightness.
Refer to “Tires and Wheels” on page 9-06.

Disc brake pads should be inspected for wear whenever tires are rotated.
NOTICE
Rotate radial tires that have an asymmetric tread pattern only from front to rear and not from right to left.
WARNING
- Do not use the compact spare tire (if equipped) for tire rotation.
- Do not mix bias ply and radial ply tires under any circumstances. This may cause unusual handling characteristics that could result in death, severe injury, or property damage.
Check your tires once a month or more. Also, check the tire pressure of the spare tire. How to check Use a good quality gauge to check tire pressure.
The wheels on your vehicle were aligned and balanced carefully at the factory to give you the longest tire life and best overall performance. In most cases, you will not need to have your wheels aligned again.
Other information:
Kia Picanto (JA) 2017-2026 Service & Repair Manual: Power Door Locks
Components and components location Component Location 1. Driver power window switch 2. Assist power window switch 3 . Body Comtrol Module (BCM) 4 . Door lock knob 5 . Tailgate actuator 6. Door latch lock actuator 7 . Door lock/unlock switch 8 .
Kia Picanto (JA) 2017-2026 Service & Repair Manual: Temperature Control Actuator
Components and components location Component Location 1. Temerature Control Actuator Description and operation Description 1. Heater unit includes mode control actuator and temperature control actuator. 2. Temperature control actuator is located at the heater unit.
Categories
- Manuals Home
- Kia Picanto Owners Manual
- Kia Picanto Service Manual
- Engine Electrical System
- AVN(Audio Video Navigation) head unit
- General Information
- New on site
- Most important about car
